Wednesday, December 9, 2015

Chocolate Christmas Cookies

  • Beyond Wonderland
  • Bake these yummy Christmas cookies that double as decorations for your tree!

  • Choc Christmas cookies
  • Ingredients:  
  •  
  •  
  •  
  •  
  •  
  •  
  •  

Method: 
  1. Step 1
    Preheat oven to 180C/160C fan forced. Grease and line 2 baking trays with non-stick baking paper.
  2. Step 2
    Using an electric mixer, beat butter and sugar until pale and creamy. Add golden syrup; beat until well combined.
  3. Step 3
    Stir in flour and cinnamon and Nestle Baking Cocoa and mix until just combined. Turn dough out onto a lightly floured surface and knead lightly until smooth. Cover and place in the fridge for 30 minutes to rest.
  4. Step 4
    Using a lightly floured rolling pin, roll out dough until 4mm thick. Using 8 cm star or snowflake shaped biscuit cutter, cut shapes from the dough. Place on prepared trays. Then using a 4 cm star or snowflake shaped biscuit cutter, cut a smaller shape from the centre of each biscuit.
  5. Step 5
    Use a thin drinking straw to cut a small hole in the top corner of each biscuit. Continue cutting biscuits from the dough, re-rolling as necessary. Bake for 12 minutes or until golden Set aside to cool slightly.
  6. Step 6
    Spoon Nestle White Melts into a piping bag; drizzle on to biscuits.
  7. Step 7
    Thread ribbon through the hole in each biscuit and secure with a knot.


Recipe courtesy of: www.taste.com.au 


Tuesday, November 24, 2015

The most common home decorating mistakes revealed

The most common home decorating mistakes revealed
For the inexperienced, decorating a home can feel like an overwhelming task. Before you begin, take note of what not do to when styling your new home.

1. Over-cluttering the bedroom
The bedroom should be a restful, uncluttered space – a sanctuary from daily life and a peaceful place to start and finish the day.
“The colours and textures used in a bedroom should also reflect those moods and not be too loud and overbearing,” says Natalie James, interior stylist at The Stylesmiths.
Photo: The Stylesmiths

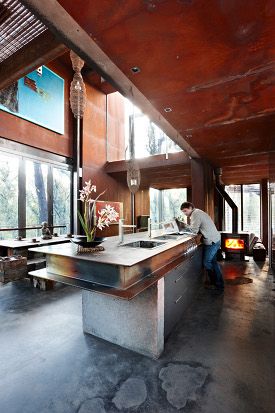
2. Choosing monotonous flooring

Many people are told that there should be a single flooring solution in a room to make the space seem cohesive and bigger.
“This comes at great expense to the homeowner, and can actually work against the design intent by creating a vacuous space. It often also means that good quality flooring, such as original floorboards, are hidden under cheaper flooring options like laminate or carpet,” says Rohan Little, Principal of Oxide Design.

Photo: Oxide Design

3. Placing carpet on carpet

“High up on Julia Green’s list of decorating mistakes is placing thick rugs on thick carpet.
“It’s counterproductive, a tripping hazard and looks ridiculous,” says Julia Green of Greenhouse Interiors.

Photo: Pinterest

4. Selecting an overly dark palette

Dark, bold or strong colour schemes can often make spaces appear smaller.
“My advice is keep things bright and clean and integrate those eclectic items you like in small doses; that way they can be seen and shown off,” says Georgia Ezra​ of G.A.B.B.E Interior Design.

Photo: (Brand) Balwyn Home by G.A.B.B.E Interior Design (Photography) Stewart Leishman

5. Pushing furniture against the walls

Contrary to popular practice, bringing furniture in from the walls creates intimacy and balance. 
“Never push furniture right up against the walls, particularly in small spaces,” says Bec Astrinakis​ of Nathan + Jac.

Photo: Pinterest

6. Mixing natural and faux materials

Limit the palette of your materials for a refined outcome.
“If you are looking to use natural materials such as marble surfaces or timber veneer finishes, avoid faux finishes in close proximity,” says Clare Kwok​, Associate at ClarkeHopkinsClarke​.

Photo: Pinterest

7. Forgetting the light

A sun-filled area is imperative to creating an environment that’s both aesthetically pleasing and enjoyable.
“If you don’t have a lot of natural light, you need to invest in lots of mirrors. Mirrors will reflect and increase the light in the room, giving the illusion that the room is light-filled,” says Georgia Ezra​ of G.A.B.B.E Interior Design.

Photo: (Brand) Balwyn Home by G.A.B.B.E Interior Design (Photography) Stewart Leishman

8. Choosing a small rug

Go for the largest rug you can afford in your space.
“My pet hate is rugs that are too small; they float around the middle of the room and don’t do anything,” says Lauren Macer of Sisalla Interior Design.
“If you’re putting a rug underneath a dining table, don’t forget to allow at least 50 centimetres extra width on each side of the table so the chairs stay on the rug even when you’re seated at the table,” says Victoria Baker ofTemple & Webster.

Photo: Sisalla Interior Design

9. Placing gloss on gloss

When thinking about kitchen finishes, gloss finishes should not be used on every surface but rather as ‘highlights.’
“Gloss on gloss on gloss tends to look a bit tacky,” says Fei Chau, Associate at ClarkeHopkinsClarke​.

Photo: Pinterest

10.  Not going the extra mile

Adding a final layer of decoration gives your room personality.
“The key is mixing ‘like’ items together from various sources to avoid the showroom look. Mix decor according to material…or arrange by colour or theme,” says Lauren Macer of Sisalla Interior Design.

Photo: Sisalla Interior Design

11.  Not choosing a theme

Successful interior decorating and styling has a strong sense of purpose and continuity that brings a space together.
“The most common decorating mistake people can make starts with not having a sense of the story or theme the decorating will follow,” says Nicholas Travers, Director at TechnÄ“ Architecture + Interior Design.

Photo: Pinterest

12.  Hanging art too high

Homeowners should arrange art at eye level to attract the most attention.
“The average eye level is 150 centimetres from the ground up and this is where you should be centring your artwork on your walls. You don’t want to strain your neck to see your beautiful artwork,” says interior stylist,Emma Blomfield.
“Always hang the middle of the art at eye level. Or, for a modern take, lean your artwork instead of hanging it,” says Bec Astrinakis of Nathan + Jac.

Photo: Nathan + Jac

13.  Going overboard on the trends

Your scheme will generally work better by choosing only a select few ‘on trend’ pieces.
“Think about walking off the runway in full Gucci; it looks amazing on the catwalk but not so great in real life,” says Fei Chau​, Associate atClarkeHopkinsClarke​.

Photo: IKEA

14.  Pancake flat cushions

Invest in feather inserts for your scatter cushions.
“Polyester-filled inserts will flatten down within moments of stuffing your new cushion covers, plus they aren’t comfy to snuggle into. Feather inserts make your cushions look better and mould to your body,” says interior stylist, Emma Blomfield.

Photo: Pinterest

15.  Not being clever with colour

Rooms with strict colour schemes run the risk of looking predictable and unimaginative.
“Stick to a colour story but add depth and visual interest by working with a mix of lighter and darker shades in your chosen colours,” says Jessica Bellef​ of Temple & Webster.

Photo: Pinterest

16.  Selecting disproportionate furnishings

Achieving the right proportions to a room is vital, but can be very tricky business.
“You can achieve the right proportion with layers – furniture and accessories of varying heights and sizes, the placement of artwork, layering soft furnishings, throws and animal skins,” says Bec Astrinakis​ of Nathan + Jac.
Article Source: domain.com.au

Monday, November 9, 2015

SLOW COOKED PORK TACO'S

SLOW COOKED PORK TACO'S


Slow-Cooker Pork Tacos

Slow-Cooker Pork Tacos
Total Time:
5 hr 36 min
Prep:
25 min
Cook:
5 hr 11 min
Yield:about 8 servings
Level:Easy
NUTRITION INFO 
HEALTHY
Ingredients
3 whole ancho chiles
3 whole pasilla chiles
4 cloves garlic, unpeeled
2 to 3 chipotles in adobo sauce
1/2 medium white onion, roughly chopped
3 tablespoons extra-virgin olive oil
2 tablespoons honey
1 tablespoon cider vinegar
Kosher salt
2 teaspoons dried oregano, preferably Mexican
3 3/4 cups low-sodium chicken broth
4 pounds boneless pork shoulder (untrimmed), cut into chunks
Freshly ground pepper
2 bay leaves
1 cinnamon stick
Corn tortillas, warmed, for serving
Assorted taco toppings, for garnish
ADD CHECKED ITEMS TO GROCERY LIST
Directions
Put the ancho and pasilla chiles and the garlic in a bowl; add 2 to 3 tablespoons water. Microwave on high until soft and pliable, 2 to 3 minutes. Stem and seed the chiles; peel the garlic. Transfer the chiles and garlic to a blender.

Add the chipotles, onion, 2 tablespoons olive oil, honey, vinegar, 1 tablespoon salt and the oregano to the blender; puree until smooth. Heat the remaining 1 tablespoon oil in a large skillet over high heat; add the chile sauce and fry, stirring, until thick and fragrant, about 8 minutes. Pour in the broth and reduce until slightly thickened.

Season the pork all over with salt and pepper and transfer to a large slow cooker. Add the bay leaves and cinnamon stick, then pour in the sauce. Cover and cook on high until the meat is tender, about 5 hours. (Or cook the meat in a large Dutch oven, covered, for 1 hour 45 minutes at 350 degrees; uncover and cook 30 more

minutes.)

Discard the bay leaves and cinnamon stick. Shred the pork with 2 forks; season with salt and pepper. Serve the shredded pork in the tortillas, along with toppings.

Photograph by Tina Rupp

Recipe courtesy of Food Network Magazine


Read more at: http://www.foodnetwork.com/recipes/food-network-kitchens/slow-cooker-pork-tacos-recipe.html?oc=linkback

Tuesday, November 3, 2015

Open Homes

Riffic Regular


Be sure to visit our Open Homes this Saturday 7th November starting form 10:00AM.  


See you there!

Tuesday, October 27, 2015

Raspberry Swirl Ice-cream cake

Esteban Regular
Codystar Regular


A sweet and creamy ice-cream cake with pretty berry swirls, topped with fresh raspberries.  


Raspberry swirl ice-cream cake

Ingredients:

- 2 cups cream

- 395 ml sweetened condensed milk

- 1/3 cup frozen or fresh mixed berries, thawed and pureed

-  150 g fresh raspberries


Method:

1.  Line base and sides of a 20cm round cake pan with plastic wrap and non-stick baking paper.


2.  Using electric beaters, beat together cream and condensed milk until soft peaks form. Pour into prepared pan. Dollop berry puree over cream. Gently swirl over top with metal skewer. Cover with plastic wrap and freeze overnight.


3.  Remove from freezer and gently ease cake out of pan and place on serving plate. Scatter over raspberries. Sit at room temperature for 5 mins before cutting into wedges to serve.


Source: www.taste.com.au 

Tuesday, October 20, 2015

New homes trends to watch for 2016

BlackFat
The year is drawing to a close and we are already wondering what will the ultimate home style for the year of 2016 be?


1. It’s time to shine
The coming year is your home’s chance to shine with a touch of metallic. “From acid wash metallic cow hide rugs to brass cylindrical vases for your flowers through to brushed brass side tables, there aren’t many homewares or interiors products that don’t work well in metallic tones,” says interior designer Emma Blomfield. You don’t have to spend much to get in on this trend, she adds: “Metallics should be considered the jewellery for your home with things like drawer handles and copper catchalls through to candle jars.” 


2. Nature comes inside
If you don’t have a backyard with access to greenery in its natural habitat, then bring it to you. “Urban living comes with a detachment of the natural sources that generate our food, longer supply chains and less personal interaction with what we eat,” says Emir Lopez from Fluid Growers, who make portable gardens to grow in your kitchen. “We all long to be connected back to nature and back to food, and to learn and teach our children where food really comes from.”


3. Practical items become features
The practical parts of your home no longer have to be boring, as more interesting designs become accessible. Aaron Lee, co-creator of online emporium Prinkbox, says it’s all about creating conversation. “People desire something they can socially share to start that conversation,” he explains. “Many interior designers are shifting towards the reinvention of everyday items as a way of reinvigorating living spaces.”

4. Bathrooms go au naturale
In the bathroom, vanity units are going au naturale. “2016 is well and truly on track to be the year of the timber top,” says Scott Beechey, Design and Selections Specialist from Mitcham Plumbtec. While stone tops have been cast aside as drab and cold, Beechey says, “timber allows a new dimension in adding a natural warmth and feel.”


7. Colours are deep and moody
With four trend-setting colour palettes recently released, Dulux is declaring 2016 the year of moody shades, futuristic inspiration and throwbacks to times past.

blue wall

(Picture Source http://bedroom891.blogspot.com.au/2013/10/this-is-cool-space-saver-to-do-twin-bed.html)

Their first offering is dubbed Infinite Worlds. “This is inspired by a growing focus on space travel and research,” says Dulux Colour Planning and Communications Manager Andrea Lucena-Orr. The dark blues and purples are contrasted with flashes of red, pink, coral and space age metallics.
Two palettes, Future Past and Retro Remix, see us looking back to the 60s and 70s. Browns and caramels are making a comeback, as are the more vibrant retro colours. Lucena-Orr says it’s all about creating a look that suits your personality: “Colour combinations can be used in unexpected ways to help create a more youthful and playful space.”
Finally, the Bio Fragility palette takes its cues from nature, with soft greens, beige and grey. “Scheming these colours together creates a beautiful, tranquil setting that’s easy to live with in most rooms within the home,” says Lucena-Orr.


9. Sustainability is king
The human conscience isn’t letting up, with people caring more and more about where the items in their home come from. “Sustainability is becoming a must design element in 2016,” says Lee. “We’re seeing more experimental ideas of mixing new sustainable and old upcycled materials, and people are opting for organic recyclable accessories.”

BIBG_Grand Designs Home_2
(Picture Source: http://builditbackgreen.org/bushfires/in-the-media/sept-2011/bushfire-rebuild-wins-highest-honour,-building-design-of-the-year.aspx)

Source:  domain.com.au 

Wednesday, October 14, 2015

Bathurst 1000 Recap

TYPO SKETCH REGULAR

Jamie Whincup smashed the lap records at Mount Panorama.
After 161 laps and a dramatic second half that saw rain, carnage and split-second calls it was race veterans Craig Lowndes and Steven Richards take the honours at the 2015 Supercheap Auto Bathurst 1000.  
Over the four days, different cars starred and looked as if they could take the honours. Everyone had their own story and there were plenty of great drives – here’s a few picks for the top pair.
Craig Lowndes and Steven Richards – Red Bull Racing Australia
Yesterday’s victory took their total number of Bathurst wins to 10.
Lowndes and Richards came from 15th on the grid to take the win by 1.365 seconds over Championship leader Mark Winterbottom and Steve Owen in strategy-fuelled final stint.
Lowndes cemented himself as a Bathurst great clocking up number six at Mount Panorama and soared back up in the points to trail by 399 with four rounds remaining in 2015.
Mark Winterbottom and Steve Owen – Pepsi Max Crew
Also starting outside the top 10, it was a remarkable comeback from Winterbottom, who was desperate to win the race not just for himself, but for injured teammate Chaz Mostert and the crew.
Owen dropped back in the pack after a poor start, but throughout the day the two clawed back into contention.
The team had to put a hard Friday behind it and Winterbottom kept his eye on the prize, which also meant extending his Championship lead to a dominant 399 points.

Garth Tander and Warren Luff – Holden Racing Team
These guys started outside the top 20 and the force was surely with them, with the Star Wars themed HRT Commodore finishing third.
Tander’s run home was remarkable with his trademark aggression put to good use in the closing stages – particularly the move on Scott McLaughlin and Fabian Coulthard at turn two.
Up 19 spots, car #2 was the biggest mover of the day and this year bounced back from the horror story that was 2014.


V8 Supercars
Article Source: www.v8supercars.com.au

TYPO SKETCH REGULAR
We had the prime position for the PANTECH truck parade! Here are some shots we got on the day.   


Wednesday, September 30, 2015

Lamington Slice

Here is a modern twist on the classic Lamington we all love! 

1:00
To Prep
0:50
To Cook
10
INGREDIENTS
EASY
DIFFICULTY
20
SERVINGS

Lamington slice

Equipment

  •  

Ingredients

  •  
  •  
  •  
  •  
  •  
  •  
  •  

Coconut topping Method 

  •  
  •  
  •  

Method 

  1. Step 1
    Preheat oven to 180C/160C fan-forced. Grease an 18cm x 28cm (base) slice pan. Line base and sides with baking paper, extending paper 2cm above edges of pan.
  2. Step 2
    Sift flour and cocoa into a bowl. Stir in sugar. Make a well in the centre. Stir in butter and egg until well combined. Press mixture over base of prepared pan. Bake for 20 minutes or until base is just firm around the edges.
  3. Step 3
    Meanwhile, make Coconut topping Combine egg white, sugar and coconut in a bowl.
  4. Step 4
    Spread hot slice with jam. Evenly top with coconut mixture. Bake for 25 to 30 minutes or until golden. Cool completely in pan.
  5. Step 5
    Place chocolate in a small microwave-safe bowl. Microwave on HIGH (100%) for 30 seconds or until melted and smooth. Drizzle slice with chocolate. Stand for 20 minutes to set. Serve cut into pieces.
Source: taste.com.au